Plantar Fasciitis Taping: a Pain Reliever Method The plantar fascia, located on the sole of the foot, is a connective tissue that supports the arch of your foot. When this tissue becomes inflamed and sore, the condition is called plantar fasciitis. Besides experiencing inflammation, the plantar fascia can be painful. To relieve pain, there are several ways: Plantar Fasciitis Taping is one such method.
Who Experiences Plantar Fasciitis?
Most often, this condition affects runners and athletes. The reason is that the arch of the foot is constantly stretching and compressing, leading to inflammation. Athletes are prone to muscle overuse and injury. When a tendon or muscle is damaged, the problem can occur more frequently.
Why Taping Works
When you tape the sole of your foot, it restricts the movement of the fascia, preventing an overexertion of the tissue. The best type of tape for pain relief is athletic tape. This tape is cotton laced with an acrylic wax that makes it stiffer than other types of tape. The adhesive quality helps the tape stick during movement. When the plantar fascia is wrapped using the stiff athletic tape, movement is restricted.
In Preparation for Plantar Fasciitis Taping
Before taping your feet to relieve pain from plantar fasciitis, you must clean your feet. By removing the debris and drying your feet, the adherent will stick better to your skin, which lends the foot more structure.
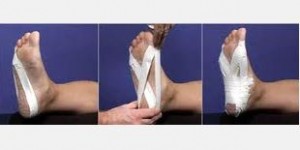
Plantar fasciitis taping
Plantar Fasciitis Taping Technique
The longitudinal arch taping technique requires two sizes of tape, often one inch and 1.5 inches. Rest your ankle on the edge of a flat surface so that your foot is facing upwards at a 90-degree angle.
Start by applying a strip of tape, on the bottom, from the first metatarsal (big toe) joint to the lateral metatarsal (pinky toe).
After that, apply a strip at the top in the same fashion, but do not connect the two strips, called anchor strips.
Start the “X” pattern from the bottom of the big toe, diagonally around the bottom of the heel and end at the base of the great toe. For the next leg of the X, start at the base of the pinky toe and loop around the ankle.
Continue this pattern until the foot feels more stiff. After, start closure strips from the anchor strips to just above the heel. Then anchor the sides of your feet (lateral and medial) around the heel.
May You Like : Plantar Fasciitis Excercises
Plantar Fasciitis Taping Removal
To remove the tape, gently soak in an adhesive remover. You can use a tape cutter to remove the layers. After removal, clean your feet with warm, soapy water. Some users experience irritation in the skin after using tape for their plantar fasciitis. To minimize this reaction, keep the feet dry and cool. It is best to remove tape directly after it is no longer needed. Always inspect your feet for rashes or allergic reactions after using tape.
Be sure to wrap the tape comfortably, but not too tightly. If it is too tight, circulation can be decreased, which is cause for concern.
Read More Information: http://runnersparadise.net
Who Experiences Plantar Fasciitis?
Most often, this condition affects runners and athletes. The reason is that the arch of the foot is constantly stretching and compressing, leading to inflammation. Athletes are prone to muscle overuse and injury. When a tendon or muscle is damaged, the problem can occur more frequently.
Why Taping Works
When you tape the sole of your foot, it restricts the movement of the fascia, preventing an overexertion of the tissue. The best type of tape for pain relief is athletic tape. This tape is cotton laced with an acrylic wax that makes it stiffer than other types of tape. The adhesive quality helps the tape stick during movement. When the plantar fascia is wrapped using the stiff athletic tape, movement is restricted.
In Preparation for Plantar Fasciitis Taping
Before taping your feet to relieve pain from plantar fasciitis, you must clean your feet. By removing the debris and drying your feet, the adherent will stick better to your skin, which lends the foot more structure.
Plantar fasciitis taping
Plantar Fasciitis Taping Technique
The longitudinal arch taping technique requires two sizes of tape, often one inch and 1.5 inches. Rest your ankle on the edge of a flat surface so that your foot is facing upwards at a 90-degree angle.
Start by applying a strip of tape, on the bottom, from the first metatarsal (big toe) joint to the lateral metatarsal (pinky toe).
After that, apply a strip at the top in the same fashion, but do not connect the two strips, called anchor strips.
Start the “X” pattern from the bottom of the big toe, diagonally around the bottom of the heel and end at the base of the great toe. For the next leg of the X, start at the base of the pinky toe and loop around the ankle.
Continue this pattern until the foot feels more stiff. After, start closure strips from the anchor strips to just above the heel. Then anchor the sides of your feet (lateral and medial) around the heel.
May You Like : Plantar Fasciitis Excercises
Plantar Fasciitis Taping Removal
To remove the tape, gently soak in an adhesive remover. You can use a tape cutter to remove the layers. After removal, clean your feet with warm, soapy water. Some users experience irritation in the skin after using tape for their plantar fasciitis. To minimize this reaction, keep the feet dry and cool. It is best to remove tape directly after it is no longer needed. Always inspect your feet for rashes or allergic reactions after using tape.
Be sure to wrap the tape comfortably, but not too tightly. If it is too tight, circulation can be decreased, which is cause for concern.
Read More Information: http://runnersparadise.net